In a nutshell
- 🧪 The science: acetic acid in vinegar dissolves calcium carbonate limescale; contact time softens deposits so they lift without force and protects finishes.
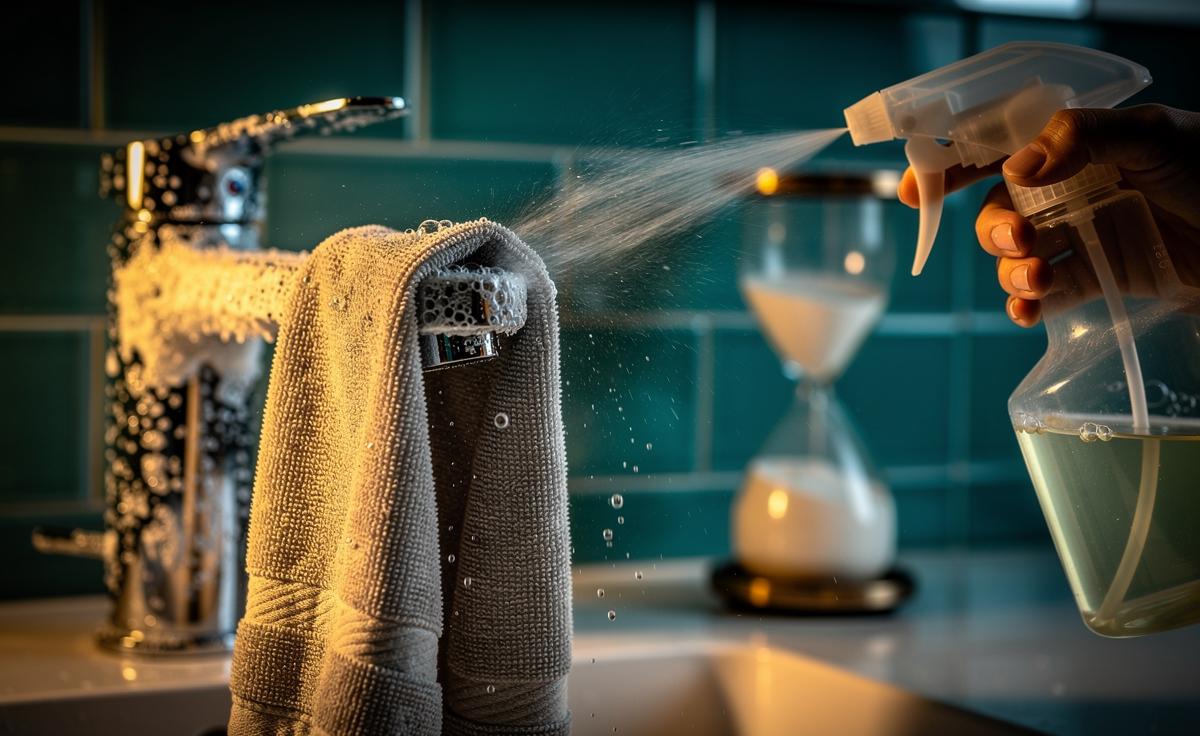
- ⏱️ Master dwell time: keep vinegar in place 5–30 minutes (taps 5–15, glass 10–30, grout 15–30, kettles 10–20), re-wet to supply fresh acid, and stop run-off with soaked cloth “compresses.”
- 🧰 Method that works: Spray generously, optionally use slightly warmed vinegar, wrap fixtures with a soaked microfibre and secure, agitate only after fizz fades, then rinse—avoiding natural stone and unsealed grout.
- 🔄 Pros vs. Cons: Soak-first means lower effort, higher sheen, and less surface damage; scrub-first feels faster but causes micro-scratches and leaves nuclei that re-seed scale.
- 🌊 Real-world fit: In UK hard water areas (e.g., London), soak-first cleaning delivers consistent results for taps, shower glass, and grout—saving time, money, and landlord-deposit angst.
There’s a simple but transformative cleaning habit hiding in plain sight: spray first, scrub later. When combating the chalky crust of limescale, especially in hard-water parts of the UK, contact time with vinegar is the difference between easy lift-off and elbow-wrenching failure. The fizzing reaction doesn’t happen instantly; it needs minutes to creep into pores and soften the mineral. Give the acid time to work and you’ll work far less. As a reporter who has toured treatment plants and descaled more kettles than I care to admit, I’ve watched this truth play out across bathrooms, kitchens, and the humble showerhead. Here’s why soaking triumphs over scrubbing—and how to make it routine.
Why Contact Time Beats Brute Force
Scrubbing feels satisfying, but limescale isn’t a chalkboard you can wipe clean. It’s a crystalline buildup—mostly calcium carbonate—that grips surfaces through micro-anchoring. When you attack it with force alone, you often smear, chip, or simply polish the outer layer without lifting the deposit’s roots. That’s why frantic scouring can leave taps looking dull yet still rough to the touch. The smarter play is to let acetic acid in vinegar dissolve the mineral bonds first. Once softened, the deposit releases with a light pass of a cloth, not a fight.
There’s a second dividend: preservation. Vigorous abrasion can scuff chrome, etch glass, and open microscopic grooves that invite faster re-deposition. A soak-first approach minimises damage because the chemistry does the heavy lifting before your sponge arrives. It’s quieter, safer for finishes, and ultimately faster for heavy crusts. In my own informal tests over the years, longer dwell times consistently reduced effort and improved results on taps, tile grout lines, and kettle spouts—particularly in London’s famously hard water zones.
- Less effort: Softened scale lifts in sheets, not crumbs.
- Better finish: Fewer micro-scratches on chrome and glass.
- Consistency: Predictable results across varied surfaces.
The Science of Dissolving Limescale
Vinegar is typically 5% acetic acid. Limescale is primarily calcium carbonate (CaCO3). When the two meet, they react to form calcium acetate (soluble), water, and carbon dioxide gas—the tell-tale fizz you see on contact. But the reaction begins at the surface and must tunnel inward. Without sufficient time, only the outer crust is neutralised, leaving a stubborn core that resists your cloth. This is why a second spray after a premature scrub often does “nothing”: the first pass sealed micro-pores with slurry, blocking fresh acid from penetrating.
Three factors control success: concentration, temperature, and dwell time. While household vinegar is mild, heat accelerates chemistry; a slightly warmed solution (never boiling) works faster. Re-wetting prevents the acid from diluting prematurely as it reacts. Crucially, gravity matters—on vertical tile, vinegar runs off in seconds unless you create contact with a soaked cloth or paper-towel “compress.” The goal is simple: keep fresh acid at the limescale interface until the fizz subsides and the deposit feels waxy-soft under a fingernail.
| Surface | Typical Dwell Time | Notes |
|---|---|---|
| Chrome taps | 5–15 minutes | Use a soaked cloth wrap to prevent run-off. |
| Shower glass | 10–30 minutes | Work in sections; re-spray if drying. |
| Tile grout | 15–30 minutes | Apply gel form (vinegar + small amount of thickener) if needed. |
| Kettle parts | 10–20 minutes | Warm solution speeds results; rinse thoroughly. |
Practical Method: Make Vinegar Work Harder
Think of vinegar as a patient technician. Your job is to introduce it to the limescale and keep them in conversation. Start by spraying generously, then engineer contact. On taps and shower heads, wrap a vinegar-soaked microfibre or paper towel; for awkward curves, a reusable elastic or a reusable food-grade silicone band keeps the compress snug. On vertical glass, spray, then apply a soaked cloth to stop run-off. If you can see liquid clinging to the scale for several minutes, you’re winning.
Boosts that matter: slightly warm the vinegar (in a safe container), re-wet halfway through the dwell to supply fresh acid, and agitate gently with a soft brush only after the fizz dims. For heavy crusts, repeat a second short soak instead of scrubbing harder. Always rinse well and neutralise any residual acidity with a brief wipe of plain water. Avoid natural stone and unsealed grout—use a pH-neutral cleaner there and keep vinegar reserved for safe, acid-tolerant surfaces.
- Pre-test in an inconspicuous spot on delicate finishes.
- Use white vinegar for minimal odour and clearer results.
- Ventilate; although mild, acetic acid can be pungent.
| Deposit Thickness | Suggested Approach | Expected Outcome |
|---|---|---|
| Light haze | 5–10 min soak, gentle wipe | Streak-free finish, no scrubbing needed |
| Moderate crust | 15–20 min soak, light brush, rinse | Scale releases in flakes/sheets |
| Heavy scale | Two 15–20 min cycles, minimal abrasion | Deep removal without surface damage |
Pros vs. Cons: Why Scrubbing Isn’t Always Better
Vinegar-first cleaning is not a fad; it’s a workflow. The Pros are compelling. It reduces effort, protects finishes, and cuts chemical use—fewer harsh descalers, less plastic, and cheaper cupboards. It’s also delightfully consistent once you master dwell time. The Cons are mostly about patience: you must wait, manage run-off, and avoid sensitive materials like marble. When time is short, the temptation to scrub early is strong, but that usually trades speed now for damage and repeat work later.
Here’s the honest comparison many busy households face. Brute-force scrubbing delivers an instant sense of progress but risks micro-scratches and leaves stubborn nuclei that re-seed scale. Soak-first cleaning feels slower at the start yet finishes faster overall, with a smoother sheen and longer intervals before the next clean. For renters minding deposits, for homeowners protecting glass, and for anyone in hard-water postcodes, the balance tilts towards chemistry-led care every time.
| Approach | Effort | Finish Quality | Risk to Surfaces | Repeat Frequency |
|---|---|---|---|---|
| Soak-first (vinegar) | Low | High sheen | Low (on safe materials) | Less frequent |
| Scrub-first | High | Variable | Moderate–High | More frequent |
Good cleaning is part science, part choreography: spray, wait, then wipe. With limescale, contact time is the quiet hero that spares your wrists and saves your fixtures. Wrap compresses on taps, warm the vinegar a touch, and re-wet before it dries; these small rituals compound into big wins for shine and longevity. The more you lean on chemistry, the less you lean on force—and the better your bathroom looks months from now. What will you try first this week: a tap wrap, a glass panel section test, or a kettle soak to prove how far patience can carry you?
Did you like it?4.5/5 (25)