In a nutshell
- 🧪 The science: dwell time lets hypochlorous acid (HOCl) oxidise stain chromophores, with pH, soil load, porosity, and temperature shaping how deeply bleach penetrates.
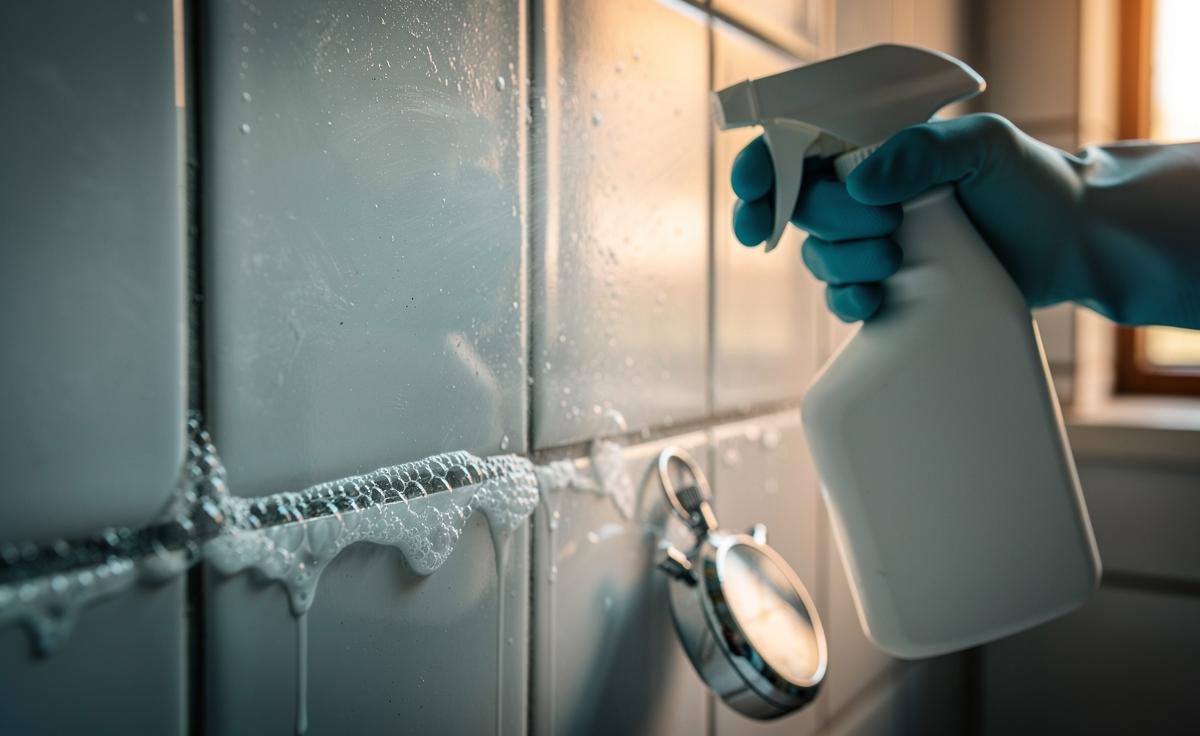
- 🕒 Practical use: UK-friendly ranges—grout/tiles 1:10–1:20 for 5–10 min, toilet bowls neat or 1:5 for ~10 min, plastic boards ~1:80 for 2–5 min, white cotton spot soaks 5–15 min; use cold water and follow labels.
- ⚖️ Why longer isn’t always better: Extra time can boost sanitisation and whitening, but risks fibre damage, corrosion, yellowing; keep surfaces wet and reapply lightly instead of marathon soaks.
- 🧼 Method that works: Pre-clean, mix cold at the right dilution, wet the surface, time 2–10 minutes, agitate lightly, rinse thoroughly, then inspect; repeated short cycles beat one long soak—proved by the tea-mug test.
- 🛡️ Safety first: Ventilate, wear gloves, and never mix bleach with acids or ammonia; test hidden spots, avoid wood/iffy grout, and pair precise timing with measured strength for reliable results.
Scrubbing alone won’t win the war on stubborn grime. The hidden weapon is time: let bleach sit, and chemistry quietly does the heavy lifting. In homes across the UK, we rush a rinse and then wonder why tea stains linger or mould reappears. Allowing a bleach solution a controlled “dwell time” lets its active species penetrate, loosen, and break down soils at the molecular level. In this guide, I unpack how dwell time works, why it matters more than elbow grease, and how to match timing and dilution to the job. Expect pragmatic tables, safety-savvy steps, and a reporter’s eye for what really delivers results without ruining your grout, towels, or lungs.
The Chemistry of Dwell Time: How Bleach Unthreads Stains
Household bleach’s punch comes from sodium hypochlorite, which in water forms hypochlorous acid (HOCl), a nimble oxidiser. Stains get their colour from chromophores—chemical structures with conjugated bonds. Over a few minutes, HOCl attacks those bonds, breaking them so they no longer absorb visible light. Dwell time is the window in which oxidation, diffusion, and bond-breaking can fully run their course. Rush it, and you’ve only lightened the surface; wait appropriately, and you dismantle stain architecture from the inside out.
Two conditions shape this: pH and soil load. Higher pH preserves bleach but can reduce HOCl proportion; heavy organic soils consume oxidiser before it reaches the target stain. That’s why a quick pre-clean makes bleach more effective. Temperature and porosity matter, too: on porous materials like grout, a few extra minutes allow HOCl to wick in; on non-porous plastics and enamel, shorter contact suffices. The art is striking a balance: long enough for oxidation to finish, not so long that materials degrade or fumes accumulate. Think of dwell time as marinating for molecules—measured patience equals predictable results.
Practical Timings and Dilutions for UK Households
Not all bleaches are equal. Many UK household products contain roughly 3–5% sodium hypochlorite. For routine cleaning, mixing with cold water is typical; hot water accelerates off-gassing and can damage fibres. Always read the label and test an inconspicuous patch before full application. Where labels are silent, the following practical ranges reflect common, safe-use practices at home—aiming for results without collateral damage.
On surfaces like sinks, tiles, and toilet bowls, a 1:10 to 1:20 dilution often gives effective oxidising power with manageable fumes, while food-contact boards call for far milder solutions and a thorough rinse. Laundry whitening benefits from shorter, cooler soaks to prevent fibre stress. Mould-prone grout needs patience, but paintwork and natural stone demand caution.
| Surface/Item | Target Stain/Soil | Suggested Dilution | Typical Dwell Time | Notes |
|---|---|---|---|---|
| Bathroom grout/tiles | Mould, mildew | 1:10–1:20 | 5–10 minutes | Ventilate well; avoid coloured grout if unsure |
| Toilet bowl | Biofilm, stains | Neat or 1:5 (as labelled) | 10 minutes | Close lid; brush then flush |
| Plastic chopping board | Food stains, odours | Mild (e.g., ~1:80) | 2–5 minutes | Rinse thoroughly; not for wood |
| White cotton laundry (spot soak) | Tea, wine, perspiration | Check label; often 10–20 mL per litre | 5–15 minutes | Cool water; rinse before main wash |
| Refuse bins/outdoor plastics | Organic grime | 1:10 | 5 minutes | Hose down after |
Never mix bleach with acids, ammonia, vinegar, or descalers. Highlight: dwell time works best when soils are pre-wiped, the area stays visibly wet, and the clock—not constant scrubbing—does the work.
Why Longer Isn’t Always Better: Pros vs. Cons of Extended Dwell
There’s a seduction in “just leave it longer,” but chemistry and materials set limits. Pros first: a slightly extended dwell can improve sanitisation, odour removal, and whitening on porous or heavily stained areas, particularly grout lines or limescale-stained plastic (after scale is removed). Giving oxidisers a few uninterrupted minutes to penetrate reduces the need for abrasive scrubbing that scars surfaces.
The cons are real. Hypochlorite can degrade elastics, dull some plastics, and yellow aged cotton. On metals, prolonged exposure raises the risk of corrosion. Evaporation shortens effective contact; what’s left can crystallise and leave residue. And if soils are thick, the first minutes are “spent” neutralising them—soaking longer won’t help unless you remove and re-wet. More time cannot fix the wrong dilution, the wrong surface, or poor ventilation. The smarter path is targeted timing: keep surfaces visibly wet for the chosen window, reapply lightly if drying begins, and stop when oxidation has done its job.
Step-By-Step Method and a Reporter’s Anecdote
Here’s a field-tested approach I use when evaluating cleaning claims in British homes and labs alike. It’s designed to balance effectiveness with material safety and clear, repeatable timing.
- Pre-clean: Wipe away loose dirt; rinsing first reduces “bleach burn” on textiles.
- Mix cold: Prepare the right dilution in a ventilated area; don gloves.
- Apply to wet the surface: Use a cloth or sponge; avoid overspray.
- Start the clock: Aim for 2–10 minutes depending on the table above; keep it visibly wet.
- Agitate lightly: Midway, a brief swipe can expose fresh stain molecules.
- Rinse thoroughly: Especially on food-contact surfaces and fabrics.
- Dry and inspect: Repeat with shorter intervals rather than a single marathon soak.
Case in point: testing tea-stained mugs for a feature, a 1:20 bleach soak for five minutes outperformed a 30-second scrub—and a 15-minute soak offered no extra whitening but left a faint chlorine taint. The winning formula was modest strength, precise dwell, full rinse. That pattern echoed across grout and chopping boards: the clock, not brute force, decided success.
Bleach is blunt yet brilliant when treated with respect. Dwell time converts it from a harsh last resort into a precise tool: apply, wait, rinse, and let chemistry make you look like you’ve scrubbed for hours. The key is pairing the right dilution with a realistic window, keeping surfaces wet, and quitting before damage begins. Measure minutes, not muscles, and the results arrive quietly. Which surface in your home most needs a patient, well-timed approach—and what timing will you try first to let the science shine through?
Did you like it?4.5/5 (22)